Showing posts with label titans. Show all posts

Sunday, September 15, 2013

Devourer of Hope


The Devourer of Hope is finished - we'll he's been finished for a while, but now is photographed as well!


I've re-ordered my piles of skulls as the warp seems to have eaten them all too, so the Soul of Atrocity is still waiting to be constructed. However I also acquired some black spray at last, so will get to some defilery things soon.

Thursday, July 25, 2013

There's No Imagery Like Satanic Imagery, Like No Imagery I Know!


Still need to touch up the metal edging and gloss coat the panelling, but now about 80% done. 


Bonus close up of his face:


Wednesday, July 17, 2013

Apocalypse 2nd Ed - First thoughts

Overall, I think the new edition is fantastic. Clears up a lot of the ambiguity and streamlines much of it (I like that they suggest scrapping all vehicle damage aside from blown up for instance) and it's written much tighter, so there's not as many holes in the rules.

 (Apocalypse, in macro form)

They also toned down the horribly broken combos, and while there are a few solid choices to be made there aren't any no-brainers. StrD is not so bad as some make it out to be IMO. Highly effective at killing vehicles as always, but there's a 1 in 6 chance it will do nothing to infantry.


 One thing I don't like is the new "after the break" system for some things as it's a bit too meta for my tastes (and I usually love meta stuff). I understand it as a concept and I do like that they've included more of a guide for organising, but tying rules to when you have lunch is a bit... odd.
Not a huge fan of keeping most vehicles off the board either by restricting their entry, but I see why they did it. Still no big deal and I'd rate this version 50% better than the old one.

 As for my thoughts on specific dealies...


 Assets:

 Flank March - now only brings on one formation. Did you know you can have 200 Necron warriors in a formation?

 Trophy Kill can be good as it's easy to vapourise people with StrD now and earn an easy 3 VPs to recycle Titans over and over with.

 Tunnel Rats could be used to hilarious effect with Precise Coordinates to deploy gigantic swathes of IG to the board up close and personal.

 Most of the Space Marine ones are kinda terrible, mostly due to small scale or not particularly epic effect. 

Daemon Shell got improved as you don't have to nominate who has it until you shoot it.

 Ere We Go can't hurt in the world of random charges.

Idol of Gork (or possibly Mork) - give you Rage! Must be in your deployment zone... uh, no.

 Mek Workshop - restores vehicles to full hull points. Combine with Stompa Mobz and have everyone hate you.

 Strands of Fate. Good for bragging rights or just being an insufferably smug Eldar player. Unless you roll a one in which case play it off as a joke.

Webway Assault - crazy good, especially when combined with the Kabalite Web Strike to give you four vehicle accessible portals anywhere on the board.

World Digestion - still as annoying as ever.

Entropic Plague - everyone will hate you. Forever. But you're playing Necrons so that should only make you more powerful.


Formations

The big change is that Formations are now free - so if you have the models just whack them into one because there's only benefits (aside from needing to squadron up).

Some interesting things about the changes to Superheavy vehicles are that, aside from being unstoppable killing machines, they're generally faster, can be targeted by psychic powers (Baneblade with 4+ invulnerable!) but can also be locked in HtH combat, which is a huge change with how assaulting Titans will play out. Before with having to disengage each turn it left attackers vulnerable to countercharges and being shot to death. Now they can tie up a Titan much longer. I think StrD melee weapons will be a little more common now out of it, as most Titans don't have a high attack score to just bludgeon their way out of combat (even with Stomp attacks).

High Commands are also basically amazing as they give you one free Strategic Asset during the game.

Anyways, arm up, and let's look at what's cookin':


Lord Castellan's Command is a great choice for an IG army, with lots of benefits at a relatively low points cost. Trick is to keep Creed alive of course.

The Space Marine Companies are both good, especially if you're planning on taking them anyway. The only downside is you have to deploy them all together. 1st Company is a bit better as it gives everyone Deep Strike and Fear as well as lots of other benefits.

Wings of Sanguinius can deep Strike in the enemy's turn, meaning next turn (if they survive) they can run around and assault and so on.

The GK Extermination Force is probably the only formation I would come close to calling broken. While it fits the background if you bring it against Daemons in particular don't expect many invites again. It does have the weakness that the Dreadknight is the key so it's not that dangerous.

The Lord of Skulls is perhaps a little overpriced (I must meditate on this some more), but not hugely.

The Tetragon of Darkness isn't anywhere near as annoying with the change to StrD weapons.

Dread Mobs are a great investment for any Waaaaagh.

The Stompa went up in points..? I'm not seeing why.

Phantom Titans are good now, really good (assuming you can keep them out of assault). The D-Cannon did lose the ability to ignore shields, which kinds blows, but the new Superheavy damage rules really benefit the Eldar the most.

Sunstorm Squadrons got even crazier and will utterly annihilate huge chunks of the battlefield easily. One of the deadliest formations in the book IMO.

Fielding a Wraithknight Dreamwalker Squad is nifty and could really catch people off guard when they start running around 11" a turn.

All the Dark Eldar formations are good, but Dark Olympiad (even better with the Duke)and Kabalite Web Strike are the stand outs. Everything in the book for the DE works so well together they can easily be a top Apoc army without any Superheavies.

Endless Swarm is kinda insane as after turn 4 you can only Snap Shot at it, and it is theoretically infinitely large...

The Heirophant has been fixed up so it now actually has workable rules, and I don't think is either borked or over priced depending how you look at it.

The Necrons are a real mixed bag. A few don't seem very good due to either just not being very good (Obelisk - very situational) or impractical (Baleful Necropolis - stay within 3"? Why, yes, I do want lots of StrD pie plates!). Infinite Phalanx is funny as it's a single 50+ warrior unit. The downside is that it's all one unit so can be bogged down in HtH by a few guys for a long time.

The Tesseract Vault and Transcendent C'Tan can be dead killy (the C'Tan especially), but can also be very, very pricey. You can easily make the C'Tan cost over 800pts, and it will wreck face without doubt, but it also explodes horribly when it dies so...

The Macro Cannon Aquila is a fairly cost effective way of getting StrD and an AV15 bunker into the deal. The Vortex version isn't as good simply due to the Vortex rule changes.


So that's my thoughts on the first pass of the book. Not necessarily accurate, not necessarily final, but certainly there. Or here. Or whatever.

Monday, July 15, 2013

Scorpio Colossi


Since my harvest of skulls is still yet to arrive I decided to get started on my Greater Brass Scorpion. Now obviously since I'm using its cannon for the Soul of Atrocity it would need something to fill its spot:


I never really liked the "gun face" look, and the pair of cluster caltrop pods from the Reaver Jetbike box fit perfectly. They're mounted on the front of a Sentinel and there's an armour plate from a Defiler claw above it.
If anybody complains about lack of demolisher canon they shoot death rays, obviously, I mean sheeze...


Less obviously all the armour plates and the fore claws are not glued on yet so they can be painted separately.

Also I'm not sure what to name this one. I was thinking Desecration of Hope, but it's not murderous enough. Something with Annihilation, Obliteration or the like in it maybe. Fast, brutal but with a sense of grandeur and giganticness to it. Suggestions welcome!

Thursday, July 04, 2013

The Tower Rises!

Construction has continued in Khorne's bloody name, despite the best efforts of Nurgle to lay me low:


Cowardly Tzeentch is also up to his tricky ways, fouling the immaterium and delaying delivery of my necessary haul of skulls to continue construction much further.

The main gun is from the Greater Brass Scorpion, and the upper tower guns are from the Forgefiend kit. they are mounted in the window on Icarus Lascannon mounts:


These windows will be filled with skulls, whilst the middle row and front will be filled with imagery depicting total destruction as befits such a mighty engine of war.

Wednesday, May 11, 2011

Phantom Titan build pt 8: Painting (ii)


Just a quick update with some more shading and detailing. I've also used 'ard coat on a number of areas to give a different texture. I've still got to go over her and ink the armour lines and finish the base, but otherwise she's almost done.

Painting minis to match the TRON colour scheme is quite a challenge as there are no metallics or other colours - it's various shades of black. Still, it's an enjyable challenge as it's forcing me to think about my painting rather than do the stock standard I normally would.

Friday, May 06, 2011

Phantom Titan build pt 8: Painting (i)

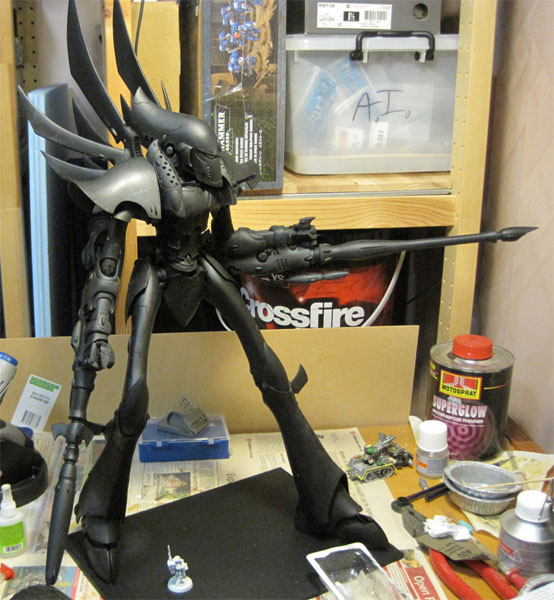
More like PhanTRON.

Obviously it took a couple of steps to get to this bit, but it's a good opening pic. First thing was to set up a spray booth, a much more significant effort for something the size of the Phantom.


Second step was to re-coat her with Chaos Black using the airbrush. Why the re-spray when I'd already based her? Firstly there were still some small spots that were missed, such as between the fingers, and the Chaos Black spray is matt, while the stuff from the pot has a slight gloss to it, and if I need to touch up with a brush it'll stand out much more.

After the black coat is finished I used Charadon Granite in the airbrush to lay down some bulk highlighting:


I chose Charadon as it has the slight greenish tint to it, avoiding the model looking too flat and lifeless (being a giant block of black and all). I applied a black wash to some areas after the Charadon had dried to give a slight change in tone to some areas.

Then the fun of taping out the lines:


This took around 45 minutes to complete. Where possible I used references such as the lines in the armour or ridges as a reference to keep symetry.
The lines were sprayed in white and then Spaz Stix Fireball Orange:


The glow effect was achieved after the tape had been removed by spraying orange lightly around the areas.

But before I could do that I had a near disaster, as quite a few sections had paint come away, as can be seen in the picture above (note the right thigh and rear of the helm). At first I grumbled a bit and assumed it was just loose and peeled off. Unfortunately, I discovered this was not the case.

The sections missing paint were oily in the extreme.

Obviously this was a big problem. Now it was likely not due to mould release grease as I had most definately cleaned the parts thoroughly. It was likely due to an unfortunate side effect of resin's makeup. Resin is a two part mix, much like greenstuff - only liquid, and sometimes it doesn't get mixed evenly. This leads to the resin seeming cured, but still being in a semi-set state bleeding the excess compound.
There was a great article discussing it a few weeks ago but I couldn't find it - long story short there's nothing to be done about it save keeping fingers crossed that it sets soon and doesn't do any more damage.

This is of course worrying for the next stage of painting where I'll be detailing and highlighting by hand, so any bad spots could get stripped by an errant brushstroke.


To ease that worry I was fortunate enough to pick up my vintage Nausicaa poster (original release, mint [not even blu-tac marks or pin holes]) from the framers today, so she's now hung on the wall next to me.


Next up: More painting, or a whole lot of swearing if it all goes wrong. I may do an interlude on naming the Phantom as it will take some time to have enough done to be worth posting.

Thursday, May 05, 2011

Phantom Titan build pt 7: Helm & Steersman.

Due to the pose I'm using the head/cockpit/helm/bridge/noggin is turned to the left. This means that despite being hinged the outer casing wouldn't be able to open.
My initial thought was to magnetise the neck joit so when I wanted to open the head I could turn it and operate the mechanism. My second thought was to not bother and just take it off to reduce the amount of movement and wear.

So I haven't assembled any of the hinge mechanism aside from the pins on the cowling, as they are aesthetic as well as functional. However, if I were to assemble the mechanism I'd replace the hinge mechanism with something more durable than resin, such as brass or acrylic rod and a metal ring.

Instead of doing that, I decided to customise the steersman, and in keeping with the TRON theme of the titan I chose to model the pilot on Quorra:


First step was to remove the previous occupant. I used my dremel with the large engraving tip, which made short work of his head. After that I removed his spirit stone and part of his shoulder strap thingy.
I selected a Hasslefree head, and mounted it on a pin, drilling a corresponding hole in the neck:


After getting a good fit I removed the head and, holding it in my pin vice, sculpted the hair on. I was careful to keep the asymetrical cut (it's longer on the left, most noticable on the fringe) and when I was happy added a neck and glued it in.
Then I did the basics of the chest armour and shoulder strap:


I made a fairly obvious mistake here: I didn't prime the head before fitting it, so couldn't get to the back of it to paint the hair (d'oh!). Luckily she's got black hair, so it was an easy fix, but it could have been very bad.
Brain farts aside, I finished up the armour and added a spirit stone:


Painting:


The blue lines need to be lightened more (they are closer to a whiteish aqua in the movie than pure blue), but I'm having trouble sourcing the white paint I need and as it's a lethal alcohol based paint I can't just mix with acrylics. It's not a big deal (yet) as she looks ok, and it is easy enough to go back over the lines at a later date.

I added a HUD made out of a blister pack cut to fit, painted with Spaz Stix neon paint, and glued it to the dashboard, which was stuck in place:


The (kinda) finished cockpit:


Next up: Painting!

Wednesday, May 04, 2011

Phantom Titan build pt 6: Arms, Shoulders and Accessories

The arms, or more specifically the shoulders, gave me more trouble here than the entirety of the rest of the build. But first, I started with the elbows.
They came together in almost the same way as the knee joints, including the slightly annoying void space in the joint, though this time there was not too much of it. This is due to the elbows being designed to fit together with the arm bending at 90 degrees with very limited varience from that pose.

Of course, I'm not doing anything that simple. While the left arm will be bent, the right will be almost pointing straight downwards. There were two major areas that would cause problems:

1) The kit isn't designed to be posed this way - some work woul dbe required to make it work (no problem).

2) Due to the limited surface areas pinning will be a problem. Unlike the knee joints the gun wil be hanging free, so any pin will have to anchor the gun to the elbow in such a way to prevent it falling off. This will be a very high stress joint (also prone to being knocked), so this was more of a problem.


Unlike the knees, which were the size of a standard infantry figure, the elbows were much slighter, and they were fitting into smaller sections. As you can see above I opted to go into the gun first and then the elbow. To compensate for the change in posture I came up with a simple, yet timeless solution: big wad of greenstuff.

The left gun arm, being mounted in the manufacturer's recommended position, was an easier affair. All I had to do was fit a pin horizontally into the elbow.

Both upper arms were pinned diagonally down into the elbow, drilling down from the seam line on the upper arm. Where I drilled is visible on the picture marking the pinning positions below. I considered putting a small pin through the elbow, like a hinge, but decided against it as I was worried it would be putting too many holes in the material to make it worth while.


Next came trying to get the arms attached to the shoulders. The plan was simple:

- Glue outer and inner shoulders together.
- Place in position on torso.
- Drill hole into torso through shoulder socket.
- Tack upper arm in place with spot of superglue.
- Drill through reverse of shoulder into upper arm.
- Pin in place.
- Congratulate self on job well done.

Yeah... not so much.

I ended up taking two more attempts... and used the first hole anyways.

The problem with my plan is that, unfortunately, the design of the shoulders is really, really, really bad.

This isn't something I say lightly - I first noticed it when I was looking over the instructions and test fitting the pieces after cleaning, and was unfortunately correct on. The problem is the way the layered shoulder guards fit together in relationship to the way the arm and torso attach.

The outer shoulder fits around an extended ring on the torso, with a fairly small contact area. The inner shoulder clips into the outer, joining solidly at the base, but by a 3mm tab at the top. The upper arm has a ball that cups in the inner shoulder.

So the entire arm assembly is effectively being held by a 3mm wide, 2mm tall tab of resin. This is not good:


It also creates a problem as there is a large void space between the shoulders and torso, so trying to get a pin to line up between them is a right royal pain - not to mention everything is at odd angles, curved or underhanging the shoulder guards.

It would have been much better to have the torso rings extend out further for the upper arm to connect to directly, and have the inner shoulder join in the same way but be hollow.

In any case, the right arm had four attempts at drilling a hole that lined up correctly and allowed the outer shoulder to join on straight, while the left has a pin bent in a slight zig-zag...

There quite possibly was some way of doing things by packing out the cavity with greenstuff but where the other places I've done that have been due to my choice of pose of wanting to be sure of stability, this just seems like a big design oversight.

 Pin positions.

Still, before the arms go on, some other parts need to be attached to make sure they're not going to clash - and before they go on they are undercoated.

The gun barrels are also fixed on at this point. I didn't pin them as I would rather they break off if hit than they take the whole shoulder out (I'm a bit paranoid about them). The gun's hoses and fins are glued in place.

The large shoulder guard mounting rings need to be put on now, as they can't be attached after the shoulders go on. The missiles, small wings and various decorative plates are also stuck on here.


Once they are all in place I fixed the arms on, with much cursing, but they seem stable enough now.


You may notice in the pic above the shoulder scatter laser is pointing a fair degree upwards. This is due to my failure to check the angle the missiles mounted on the torso when I fitted the magnet. It wouldn't be too hard to correct had I discovered it before I glued the missiles to the torso, but too late now.
Luckily it's under the AA missile pod, so it works ok.


Next up: The helm and converting the steersman

Sunday, May 01, 2011

Phantom Titan build pt5: Torso and Mounting to the Base

First step in the torso assembly is to pre-paint some of the parts. This isn't detailed work by any stretch of the word, but undercoating the sections that will overlap. This is becase some areas may not be accessable to paint at a later date, but will still be visible from certain angles, and having grey show through would not be a good look.
As the Phantom's base colour will be black I'm just using Chaos Black spray, but if it were to be a different shade or colour I'd use that instead.

Through a combination of dry-fitting and reading the instructions it is fairly easy to determine where the most likely problem areas will be.
It is not enough to simply spray the part in question in total as the coat of paint will prevent the glue sticking the parts together as well. To combat this I use painter's tape to mask off the areas where the parts will join before spraying:


The parts are the then sprayed, leaving clean sections for gluing:


While they dry it is time to mount the Phantom to her base. I'm doing this now as with the addition of the wings she's going to be extremely back heavy, so for work to continue she needs to be able to stand. It's also better to mount the model now before it becomes too unweildy, fragile or heavy.

I'm using 2.3 x 50mm nails for the heels, and 1.8 x 40mm nails at the toes. The base is made from two pieces of 3mm acrylic sheet glued together. They are effectively laminated to each other by copious quantities of glue (and left overnight under a stack of Imperial Armour books and a bench grinder), so are very rigid.


The pins are drilled, the toe holes being cut at an angle to go through the outer toe into the inner section, to give the maximum depth of penetration.


Once I was happy with the depth and angle I glued the pins in place and left to set for a moment, before beginning the pinning of the torso.

To start with I positioned the lower torso where I wanted it, and drilled a hole down through it (holding it in a clamp), and a matching hole into the waist. I'm using the same 2.3 x 50mm nails as before, and they are long enough to go into the waist, through the lower torso and out again, so there was no need to pre-drill of mark the holes.


The next step was to hold the lower torso and centre torso in the position I wanted them, and push the nail through the hole from the bottom. This left a mark on the bottom of the centre torso, showing where the pin would connect the two parts. It was only a join of a couple of mm, but enough to hold the parts in position to each other.

I then drilled a hole through the centre torso into the lower torso deep enough that it left about half the pin still protruding. Repeating the method of holding the loose centre and upper pieces by hand I marked teh upper piece and drilled it.
The centre and upper pieces are both fairly shallow, so the pin extends upwards into the neck slightly, but is still firmly mounted in the lower section.


It is important to note that nothing has been glued yet - I still have the freedom to change anything if I so wish, as once the glue goes on the model is not going to come apart without some serious destruction.

That said, I was happy with how the pose looked, so as the first step of gluing the stomach plate was affixe to the lower torso and the lower torso to the waist.

Next up I simultaneously put the centre and upper torso parts in place due to their interconnectivity.

After they were dry, I put two more pins in, one in the lower torso into the waist and one in the centre torso, both going front to back. This was just for a little more stability and security, as more is certainly better than less.


Pins shown in red - Marcin's idea of armature must have buried itself in my brain.

As a point of interest I affixed the large wings before mounting the upper torso. I did this purely to give me a better feel for the model's final pose, so I wouldn't say it's purely personal preference if they go on before or after torso assembly


One very important step I performed here was to get out the vacuum and go over the model and work area to remove the dust. There was far, far too much to simply brush off and since some of the next steps involve more pre-painting getting her clean was important.


Here she is posing with a dry-fitted shoulder assembly, missiles and noggin (which will be the next areas worked on):